DOLFIN:C++/Python有限元库》日志/诊断/参数【翻译】
【章节目录】
10·3·12 日志/诊断
DOLFIN提供了一个简单的接口来统一处理日志消息,包括警告和错误。 所有消息都收集到单个流中,这使整个程序(包括DOLFIN库)的输出的目的地和格式可由用户控制。
打印消息。 通常使用info命令打印来自DOLFIN的消息报文。 该命令采用字符串参数和要格式化的变量的可选列表,与标准C printf命令非常相似。 请注意,info命令自动将换行符附加到给定的字符串。 另外,C++用户可以将dolfin::cout和dolfin::endl对象用于消息的C++样式格式,如下所示。
// C++ code
info("Assembling system of size %d x %d.", M, N);
cout << "Assembling system of size " << M << " x " << N << "." << endl;
# Python code
info("Assembling system of size %d x %d." % (M, N))
info命令和dolfin::cout/endl对象与标准C printf命令和std::cout/endl对象的不同之处在于,输出定向到特殊的流中,其输出可以重定向到标准输以及其他目标。 特别是,可能会完全禁用DOLFIN的输出,或选择打印消息的详细程度,如下所述。
警告和错误。 除了info命令之外,DOLFIN还提供了warning和error命令,可分别用于发出警告和错误。 这两个命令的工作方式与info命令大致相同。 但是,warning命令将在给定的消息前加上*** Warning: ,而error命令在C++和Python将引发可以捕获的异常。 这两个命令还将以比使用info打印的消息更高的日志级别打印消息。
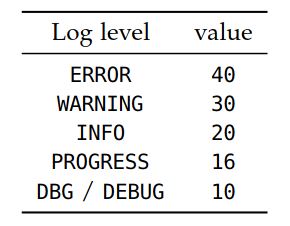
设置日志级别。 DOLFIN日志级别确定通过日志系统打印的消息路由。 仅打印高于或等于当前日志级别的消息。 可以使用set_log_level函数设置DOLFIN的日志级别。 该函数需要一个指定日志级别的整数值。 为了简化日志级别的规范,可以使用表10.5中列出的许多预定日志级别之一。 默认日志级别为INFO。 通过从C++调用命令set_log_active(false)和从Python调用set_log_active(False),可以完全关闭日志消息。 出于技术原因,用于调试消息的日志级别在C++中称为DBG,在Python中称为DEBUG。 表10.5中对此进行了总结。

要以任意日志级别打印消息,可以指定log命令的日志级别,如下面的代码示例所示。 【译者注:目前较近Python版DOLFIN已经不支持log命令了,只支持前面info, warning,error这三个日志命令和日志级别设置命令set_log_level,get_log_level和set_log_active。】
// C++ code

info("Test message"); // will be printed
cout << "Test message" << endl; // will be printed
log(DBG, "Test message"); // will not be printed
log(15, "Test message"); // will not be printed

set_log_level(DBG);
info("Test message"); // will be printed
cout << "Test message" << endl; // will be printed
log(DBG, "Test message"); // will be printed
log(15, "Test message"); // will be printed

set_log_level(WARNING);
info("Test message"); // will not be printed
cout << "Test message" << endl; // will not be printed
warning("Test message"); // will be printed
std::cout << "Test message" << std::endl; // will be printed!
# Python code

info("Test message") # will be printed
log(DEBUG, "Test message") # will not be printed
log(15, "Test message") # will not be printed

set_log_level(DEBUG)
info("Test message") # will be printed
log(DEBUG, "Test message") # will be printed
log(15, "Test message") # will be printed

set_log_level(WARNING)
info("Test message") # will not be printed
warning("Test message") # will be printed
print "Test message" # will be printed!
对象打印。 可以使用info命令来打印许多标准的DOLFIN对象,如下面的代码示例所示。
// C++ code
info(vector);
info(matrix);
info(solver);
info(mesh);
info(mesh_function);
info(function);
info(function_space);
info(parameters);
# Python code
info(vector)
info(matrix)
info(solver)
info(mesh)
info(mesh_function)
info(function)
info(function_space)
info(parameters)
上面的命令将打印简短的非正式消息。 例如,命令info(mesh)可能会导致以下输出:
<Mesh of topological dimension 2 (triangles) with 25 vertices and 32 cells, ordered>
在Python接口中,也可以通过调用print mesh来打印相同的非正式消息。 要打印更详细的数据,可以将info函数的详细参数设置为true(默认为false),这将打印对象的详细摘要。
// C++ code
info(mesh, true);
# Python code
info(mesh, True)
一些对象的详细输出可能很长。
任务和进度条。 除了用于打印消息的基本命令外,DOLFIN还提供了许多命令来组织模拟程序的诊断输出。 两个这样的命令是begin和end。 这些命令可用于程序的嵌套输出。 每次调用begin将缩进级别增加一个单位(两个空格),而每次调用end将缩进级别减小一个单位。
提供反馈的另一种方法是通过进度条。 DOLFIN为此提供了Progress类。 尽管已经尽力减少了更新进度条的开销,但还是要谨慎使用。 如果在循环的每次迭代中仅执行少量工作,则使用进度条的相对开销可能会很大。 下面的代码示例说明了begin/end命令和进度条的用法。
// C++ code
begin("Starting nonlinear iteration.");
info("Updating velocity.");
info("Updating pressure.");
info("Computing residual.");
end();

Progress p("Iterating over all cells.", mesh.num_cells());
for (CellIterator cell(mesh); !cell.end(); ++cell)
{
    ...
    p++;
}

Progress q("Time-stepping");
while (t < T)
{
    ...
    t += dt;
    q = t / T;
}
# Python code
begin("Starting nonlinear iteration.")
info("Updating velocity.")
info("Updating pressure.")
info("Computing residual.")
end()

p = Progress("Iterating over all cells.", mesh.num_cells())
for cell in cells(mesh):
    ...
    p += 1

q = Progress("Time-stepping")
while t < T:
    ...
    t += dt
    q.update(t / T)
设定计时器。 可以使用Timer类完成计时。 Timer在创建时会自动启动,并在超出范围时自动停止。 Timer在创建时会自动启动,并在超出范围时自动停止。
// C++ code
void solve(const Matrix& A, Vector& x, const Vector& b)
{
    Timer timer("Linear solve");
    ...
}
# Python code
def solve(A, b):
    timer = Timer("Linear solve")
    ...
    return x
可以显式调用Timer的start和stop成员函数。 要直接访问计时器的值,可以调用成员函数value。【译者注:成员函数value已经没有了,改用elapsed。】 可以通过调用list_timings函数来打印在程序执行期间创建的所有计时器的值摘要。
10·3·13 参数
DOLFIN保留了控制其各个组件行为的参数全局数据库。 通过统一的类型无关的接口(允许检索参数值)来控制参数,修改参数值以及向数据库添加新参数。 DOLFIN的不同组件(类)也依赖于该类每个本地实例的参数。 这允许为类的不同对象设置不同的参数值。
参数值可以是整数值,实值(标准双精度),字符串值或布尔值。 参数名称不得包含空格。
访问参数。 可以通过全局变量parameters访问全局参数。 以下代码说明了如何打印全局参数数据库中所有参数的值,以及如何访问和更改参数值。
// C++ code
info(parameters, True);
uint num_threads = parameters["num_threads"];
bool allow_extrapolation = parameters["allow_extrapolation"];
parameters["num_threads"] = 8;
parameters["allow_extrapolation"] = true;
# Python code
info(parameters, True)
num_threads = parameters["num_threads"]
allow_extrapolation = parameters["allow_extrapolation"]
parameters["num_threads"] = 8
parameters["allow_extrapolation"] = True
可以通过访问名为parameter的成员变量来控制DOLFIN特定组件本地的参数。 以下代码说明了如何为Krylov求解器设置一些参数:
// C++ code
KrylovSolver solver;
solver.parameters["absolute_tolerance"] = 1e-6;
solver.parameters["report"] = true;
solver.parameters("gmres")["restart"] = 50;
solver.parameters("preconditioner")["reuse"] = true;
# Python code
solver = KrylovSolver()
solver.parameters["absolute_tolerance"] = 1e-6
solver.parameters["report"] = True
solver.parameters["gmres"]["restart"] = 50
solver.parameters["preconditioner"]["reuse"] = True
上面的示例访问嵌套参数数据库"gmres"和"preconditioner"。 DOLFIN参数可以嵌套到任意深度,这有助于将参数组织到不同的类别中。 注意在两个接口中访问嵌套参数的细微差别。 在C++接口中,嵌套参数用方括号("…")访问,而在Python接口中,嵌套参数用方括号["…"]访问。 可以使用info函数查看某个组件可用的参数。
添加参数。 可以用add成员函数将参数(新参数的名称及其默认值)添加到现有参数数据库中。 通过创建Parameters类新实例来创建新参数数据库也很简单。 以下代码演示了如何创建一个新的参数数据库,并向其中添加一对整数值和浮点值参数:
// C++ code
Parameters parameters("my_parameters");
my_parameters.add("foo", 3);
my_parameters.add("bar", 0.1);
# Python code
my_parameters = Parameters("my_parameters")
my_parameters.add("foo", 3)
my_parameters.add("bar", 0.1)
参数数据库类似于Python接口中的字典类。 用户可以遍历键,值和项:
# Python code
for key, value in parameters.items():
    print key, value
Python字典也可以用于更新参数数据库:
// Python code
d = dict(num_threads=4, krylov_solver=dict(absolute_tolerance=1e-6))
parameters.update(d)
也可以在Python接口中以更紧凑的方式创建参数数据库:
// Python code
my_parameters = Parameters("my_parameters", foo=3, bar=0.1,
                           nested=Parameters("nested", baz=True))
解析命令行参数。 命令行参数可以解析到全局参数数据库或任何其他参数数据库。 以下代码说明了如何在C++和Python中解析命令行参数,以及如何将命令行参数传递给程序:
// C++ code
int main(int argc, char* argv[])
{
    ...
    parameters.parse(argc, argv);
    ...
}
# Python code
parameters.parse()
# Bash code
python myprogram.py --num_threads 8 --allow_extrapolation true
存储参数至文件。 将参数值存储到文件中可能很有用,例如,记录哪些参数值用于运行模拟或重用上一次运行中的一组参数值。 以下代码说明了如何向DOLFIN XML文件中写入参数值,然后从中读取参数值:
// C++ code
File file("parameters.xml");
file << parameters;
file >> parameters;
# Python code
file = File("parameters.xml")
file << parameters
file >> parameters
在启动时,DOLFIN自动扫描当前目录和用户主目录(按此顺序)中的目录.config/fenics以查找名为dolfin_parameters.xml的文件。 如果找到,这些参数将被读入DOLFIN的全局参数数据库。
【章节目录】